Welcome to ARTGR4840/5840!
AI is reshaping how products are designed and built — and this course puts you at the center of that shift. In just 8 weeks, you'll move beyond static mockups to deploy real, functional web applications using tools like Figma Make and Cursor. No CS degree required — just curiosity, creativity, and a willingness to experiment. By the end, you'll walk away with a live URL and a new way of thinking about design. Let's build something.
About the Instructor
Video: about the course instructor
[00:00] Hello everyone and welcome to the course. Before we begin exploring VIP coding and AI assisted design workflows, I'd like to briefly introduce myself and share the background I bring into this class. My education combines both design and engineering disciplines. I earned a bachelor's degree in industrial design followed by an MFA in packaging design and a master's degree in user centric design.
[00:27] Later I completed a PhD in software and security engineering. This combination of design thinking and technical engineering strongly shapes how I approach digital products and AI tools today. Professionally I've worked across multiple areas of design and technology. I started as an industrial designer in China.
[00:49] Later, I worked as a UX designer in Cincinnati, focusing on user experience, interaction design, and digital workflows. I also worked in web design and front-end development in Fargo, North Dakota, where I gained experience building interactive web applications and translating design concept into working software.
[01:10] These experiences are especially important for this course because vibe coding sits at the intersection of design, AI, and software development. My UX background helps us think critically about users and interfaces, while my front end and software engineering experience helps us understand how AI generated code actually works in real products.
[01:36] In this course, we'll focus not only on creating functional prototypes with AI tools, but also on designing thoughtful user-centered experiences.
About the Course
The Goal of this Course
- Design complete user experiences using user flows, wireframes, and design systems.
- Understand the structure of modern web applications.
- Use AI-assisted development tools to generate and debug functional web applications.
- Apply prompt engineering techniques.
- Deploy live, working web applications.
How is this course organized
This course is structured into 8 weeks, each focusing on a specific aspect of AI-assisted UX design.

Weekly Topics
- Week 1. Basics of prompting for generative UI.
- Week 2. Starting generation by user flow and site map.
- Week 3. Understanding web application in the real world.
- Week 4. Design system: control the styles of the UI.
- Week 5. Bring real data to the design: API and data binding.
- Week 6. Design documentation for AI.
- Week 7. Comprehensive prompting for larger project.
- Week 8. Put all together: Create and host portfolio for vibe coding projects.
How AI Is Changing UX Design
Discover how AI is transforming the way we approach user experience design.
[00:05] How AI is changing UX design. Design has already changed by AI in several ways. First, design has shifted from static mockups to functional executions. In 2026, designers are able to not only create static mockups in Figma, they could also create functional prototypes with actual coding. And so this will change the design deliverables to engineers.
[00:32] The traditional Figma to engineering handoff is also ending because instead of delivering Figma prototypes, designers now can also deliver coded prototypes which makes it different. UX designers now influence three areas. First, they influence how products are assembled or encoded. Second, they influence how ideas are tested via functional prototypes, not just hotspots from static mockups.
[00:57] Also, last but not least, they influence how solutions are launched. This shift is driven by AI enabled workflows, blurring the line between design and front-end engineering. AI is changing what UX designers actually do. With AI, designers can focus more on the strategies of the project or the product, the problem framing of the product and the communications, the orchestrations.
[01:26] They will need a strategic level of views to make decisions about the design and they will be focused more on validation of the design outcomes. So based on that different roles in the product team would be emerging. First product managers will be able to create build the MVPs which means minimum viable product that could be used to validate functionalities and product features and the designers will be able to prototype with code which could be delivered directly to the development team and on the other hand the
[02:05] developers could also generate the UI mockups. So the roles are merging and some new roles will grow up and some others will disappear. Also AI will dramatically accelerate the UX workflow. And now with AI, it will support nearly every UX stage including research and synthesis, user persona generation, competitive analysis, interactive prototyping, design systems, copywriting, design to code handoff and usability testing.
[02:36] So all of them will be benefited by AI automation so that the process will be much faster than the traditional workflow and with the influence of AI technologies the gap between design and development is also compressed. Before AI designers would create mockups and then deliver them and developers will work on implementation later.
[02:59] But now the roles become blurred. Now designers will create prototypes with code and developers generate UIs with them. So AI bridges design and development so everybody becomes a builder. Even though AI makes automation much easier, human thinking will matter more than ever. On one side AI is strong at speed, they can do it very quickly and it can generate a lot of ideas or solutions.
[03:24] It also scales patterns very fast and it is also very good at repeating the same tasks but there's a lot of decision making in between. So the human remains essential for a lot of things now such as judgment of the design decisions. Empathy to understand the user's ambiguity the strategy the organizational context the meaning making all will need human thinking.
[03:55] The future of UX. In the future, UX is becoming an AI orchestrated discipline. As you have probably already tried, AI will automate more executions like writing code or implementing your designs. And secondly, UX becomes more strategic and systematic. So the designers now need to stand on a higher level of decision making like how the product will work and what design we need not just how to design that and third designers become orchestrators and facilitators to facilitate the entire design process and make sure the entire process is good.
[04:36] Also, they will need to work with multiple AI agents at the same time to organize the entire working process just like organizing a team. And last but not least, human judgment becomes more valuable because AI is not perfect and what they create might sometimes have a lot of issues.
[04:55] That's why human judgment will be very important.
Overview of LLM Concepts: Tokens, Context Window, Reasoning, Tool Call, and MCP
Understand the core concepts behind generative AI models.
[00:06] Token is the unit that controls cost and capacity. Large language models do not read text as full sentences first. They process tokens. A token could be a full word, a part of the word or a symbol. Token counts affect the conversation with AI. It counts how much input fits, how many words you include in your message and how long the responses can be. Also, that is very important.
[00:32] We use tokens to calculate the cost of using AI large language models. This table shows some examples of how the cost of AI models is calculated. Basically, it is calculated by how many dollars per 1 million tokens. From this list, you can see the price of different popular models such as Gemini 3 and this is Gemini 3.1 Flash. It's a cheaper model.
[01:00] You can see that it's 50 cents per million tokens for input price and output price is $3 per 1 million tokens. Input price means how much text you submitted to the AI model and output price indicates the response you got from the AI model. When you compare the price on this list, you can find that a lot of the price is changing significantly.
[01:24] There's very cheap price like the models at the top, but also there are very expensive ones like GPT 5.5 which is $30 for output price and Claude Opus 4.7 is $25. Those are very expensive ones, but their capacity is higher and they're smarter and more powerful to use. Usually when I use those models, I just use lower, more affordable models to complete most of the tasks or the easy tasks.
[01:53] If I have some very hard problems in coding, I will just use those very expensive models. Usually once I change the model to the higher level ones, the problems will be solved very very quickly. Context window is another very important concept in large language models. It indicates the model's temporary working memory during the conversation.
[02:15] Every time you open a conversation session with an AI model in the chat box, you will have a lot of information like your current message, the system instructions, retrieved the document tools or other information like the AI model read a document from your local machine. This will also be counted into the context window.
[02:38] Also, it will include all of the prior conversation context. Each model has a limited context window. The context window will decide the limit of a chat session. What if you exceed the context window in a conversation session? Several things might be happening. But basically, the AI agent will ignore the oldest message or summarize the earlier context automatically so that you might lose the information in earlier session of a conversation.
[03:09] As a result, first AI might forget the requirements that are mentioned earlier of the conversation if you are doing this in a single project. Secondly, the code quality will suddenly decrease very quickly. Third, AI will resolve the problem you already solved and this actually sometimes will bring more bugs to the project.
[03:30] Last but not the least, debugging becomes unstable because of loss of the important information in earlier conversation. So some required information will be missing to fix the bug. Reasoning is the model's ability to analyze, connect, and infer rather than just predict the next word. Basically, it just makes the large language model smarter.
[03:54] Every time we send a new message to a large language model, it will take some time to think. That is the process of reasoning. In this process, the model will talk to itself to understand your questions deeper and then they get back to you based on the internal discussion. In vibe coding, the reasoning process helps AI to understand goals and constraints better.
[04:16] It will break problems into steps. It also helps you debug and review the code and make the design or architecture decisions. The strong reasoning models are better for complex coding tasks, multi-step workflows, agentic behaviors, and handling ambiguity. With all the previous skills or abilities, an AI agent could only talk to you and answer your questions.
[04:42] With tool call, or sometimes we call it function call, we can do more. A tool call is when a large language model decides that generating text alone is not enough and it needs to use external capabilities. An AI agent without tool call is just a chatbot that can process the prompt the user provides.
[05:06] The user provides a prompt. The language model will process that to understand it and then they send back the text response. On the other hand, if an AI agent has the ability of tool call, it can do more. It becomes a true agent that can control the user's device and help the user complete tasks automatically.
[05:28] Here is the basic process. First, the user sends a prompt to the AI and then it will call a tool or a function such as run external functions or APIs like doing a web search or read and write files. Then they might complete a task which is optional because sometimes you can just ask ChatGPT to write a document for you.
[05:52] So they will need this feature to write a document on your laptop. After this it will also receive the result of the generation and then it analyzes the result and gives you the text response. Basically with this feature an AI agent will do two things for you. It will complete the task and then it will tell you the result.
[06:13] This is one of the most important parts of vibe coding because we will ask AI to help us write code which will require them to access your computer and read and write on your computer. MCP indicates model context protocol. It is not very complex technology. It is just like an agreement like connectors allowing AI to connect to external tools, data sources and applications.
[06:39] In another word, MCP allows an AI agent to communicate with any applications. Here is one example. You can ask AI to read from your Figma file like read your Figma design and then you can also ask it to send a file to your Figma document. MCP will provide a connection between the two parts.
[07:01] So that's to make the reading and writing possible.
Overview of Prompting
Learn about the art and science of crafting effective prompts for AI models.
Anatomy of a good prompt
- Goal: What should be created?
- Context: Who is it for? What problem does it solve?
- Constraints: Platform, language, framework, visual style, accessibility, performance, scope.
- Inputs: Existing code, screenshots, design specs, copy, brand guidelines.
- Output format: Code only, explanation plus code, step-by-step plan, component structure, etc.
- Success criteria: How will we know the result is good?
Token Bloat
When a prompt, conversation, file, or retrieved context contains too many unnecessary tokens, making it harder for the AI to focus on the information that actually matters. Too much irrelevant text competes with the important text.
Why it matters:
- Irrelevant content reduces reasoning efficiency
- Noisy prompts dilute important instructions
- Excessive retrieval harms signal quality
Prompt design strategies
Effective prompt design is crucial for getting the desired results from AI models. Here are some strategies suggested by major platforms to consider:
[00:00] Here are some experiments with a good prompt and some bad prompts and how they generate the UI. First one is the bad one — really bad one. "make me an assignment app for student" — and this is how it looks from the generated page and it looks okay but you find that there's almost nothing, just some basic elements here, because this prompt is too weak. The AI does not know the app's purpose, the audience, features, visual styles or technology scope so it generates
[00:45] something generic and bloated. Let's take a look at the next one — a better version of a prompt. Here is another prompt I used: "Create a simple mobile-first web application prototype in this folder for college students to track" — use this technology: HTML, CSS and JavaScript with Tailwind — "including dashboard, design cards, due dates" and add other elements, and also use placeholder data only, focus on front-end UI, do not add login, database and back-end logic yet.
[01:29] So this prompt — here is how it looks — what my AI agent generated based on this prompt. You can see that the screen is very clean and there is enough information. It looks like this prototype or dashboard is already ready to use. This prompt clearly defines the audience, the purpose, the features, the tech stack and the scope.
[02:05] And it also prevents the AI from overbuilding by asking "do not do something." Okay. Next prompt is to update this to enhance the visual of this design. The first prompt is very simple — just one sentence: "make it look pro, make it look better" — and here is the result. Not too bad, right? However it didn't follow your control, and actually if you are going to ask the same thing using the same theme in a different project it will very likely
[02:57] generate very similar visual styles, because different models or tools have their own built-in sense of what a good design should look like. This is how it looks in 2026. If you asked the same question in 2025, they would probably generate some UI with a purple and pink background in dark mode.
[03:33] Because "better" is subjective and AI has no clear design target. Now let's take a look at another version — a more carefully controlled one. Here is the prompt and the generated UI, and you can see a lot of details are provided and the styles are carefully controlled.
[03:58] This prompt includes the overall theme — technical and modern feeling — and retains the current content and structure while refining spacing, typography hierarchy, alignment, and button styles for clear hierarchy. It also incorporates a color palette featuring soft dark grays, vibrant greens and deep blues, and ensures subtle glowing hover effects are present.
[04:35] And if you hover the cursor here, you can see it's very nice — a very cool, technical and modern design. This old one was generated from a prompt that does not emphasize style, while this new one has a very unique visual style that is carefully controlled by the designer.
[05:06] This next example is a bad prompt that causes token bloat. The prompt asks the agent to create a lot of things including onboarding, login, profile, dashboard, workout generator, nutrition tracker, calendar and more — a lot of things added all at once.
[05:34] Let's look at what it looks like. It's not working very well because too much needs to be generated for this UI. You can see a lot of errors. The agent doesn't handle responsive design well for different screen sizes.
[05:58] Something here is working which looks okay, but if I click "Start training" — nothing happens. When I first tried this I was confused for a long time until I realized I could actually scroll down to go to the next step.
[06:31] And if I scroll further and go to dashboard, the layout looks okay, but the entire logic is incorrect. I imagine this app would have multiple pages — every time I click "Start training" it should bring me to a different screen. But it doesn't; it puts everything on the same page and assumes that is what you need.
[06:59] To avoid this, during the prompting or generation process you should focus on only one screen or one feature per session. It reduces the task to one meaningful piece, preserves reasoning quality, and makes the output easier to evaluate.
Slide Show: Prompt Examples
Tools and AI Agents
Vibe coding tools fall into three broad categories — prompt-to-app builders, autonomous coding agents, and AI-native IDEs — each targeting a different level of technical involvement. Prompt-to-app builders like Figma Make charge by credit, making them easy to start but potentially expensive at scale, while token-based tools like Cursor and Claude Code tend to be far more cost-efficient for sustained work. Understanding which tool fits your task — and what it costs to run — is a core skill for working effectively in the AI-assisted design workflow.
Types of Vibe Coding Tools
| Prompt-to-App Builders | Autonomous Coding Agents | AI-Native IDEs | |
|---|---|---|---|
| Target users | General consumers and business buyers. | Broader user | Developers and technical users. |
| Examples |


|


|


|
| Pricing |
Credit-Based $$$$$ A virtual currency or "pool" of value. |
Token-Based $ Actual text units that AI read or write. |
Token-Based $ Actual text units that AI read or write. |
Slide Show: Examples of Vibe Coding Tools
More than Just Code Generation
While prompt-to-app builders are primarily focused on generating functional prototypes from natural language prompts, autonomous coding agents and AI-native IDEs offer a broader range of capabilities. For example, I use Codex to organize papers and write documents in research. My wife use Cursor's IDE mode to write fictions and manage files with the assistent of its build-in AI.
Introduction to Cursor
Starting with Cursor
More Tutorials
If you are interested in learning more about Cursor, check out the following tutorials:
Using Cursor in Plan Mode (by @leerob):
Publish a Static Website to Netlify
Static vs. Dynamic Websites
Think of a static website like a printed flyer — it looks the same for everyone who picks it up. The files (HTML, CSS, images) are prepared in advance and sent directly to the browser exactly as they are. No server needs to think or calculate anything. This makes static sites fast, cheap to host, and very easy to deploy.
A dynamic website is more like a restaurant that cooks your meal to order. When you visit, the server runs code, queries a database, and builds the page specifically for you — your account, your preferences, your history. Social media feeds, e-commerce carts, and login pages are all dynamic.
| Static | Dynamic | |
|---|---|---|
| Content | Same for everyone | Personalised per user |
| Speed | Very fast | Depends on server load |
| Hosting cost | Free or very cheap | Requires a server (higher cost) |
| Examples | Portfolio, course pages, docs | Instagram, Amazon, Gmail |
Everything you build in this course is a static website — which is exactly why Netlify can host it for free with just a drag and drop.
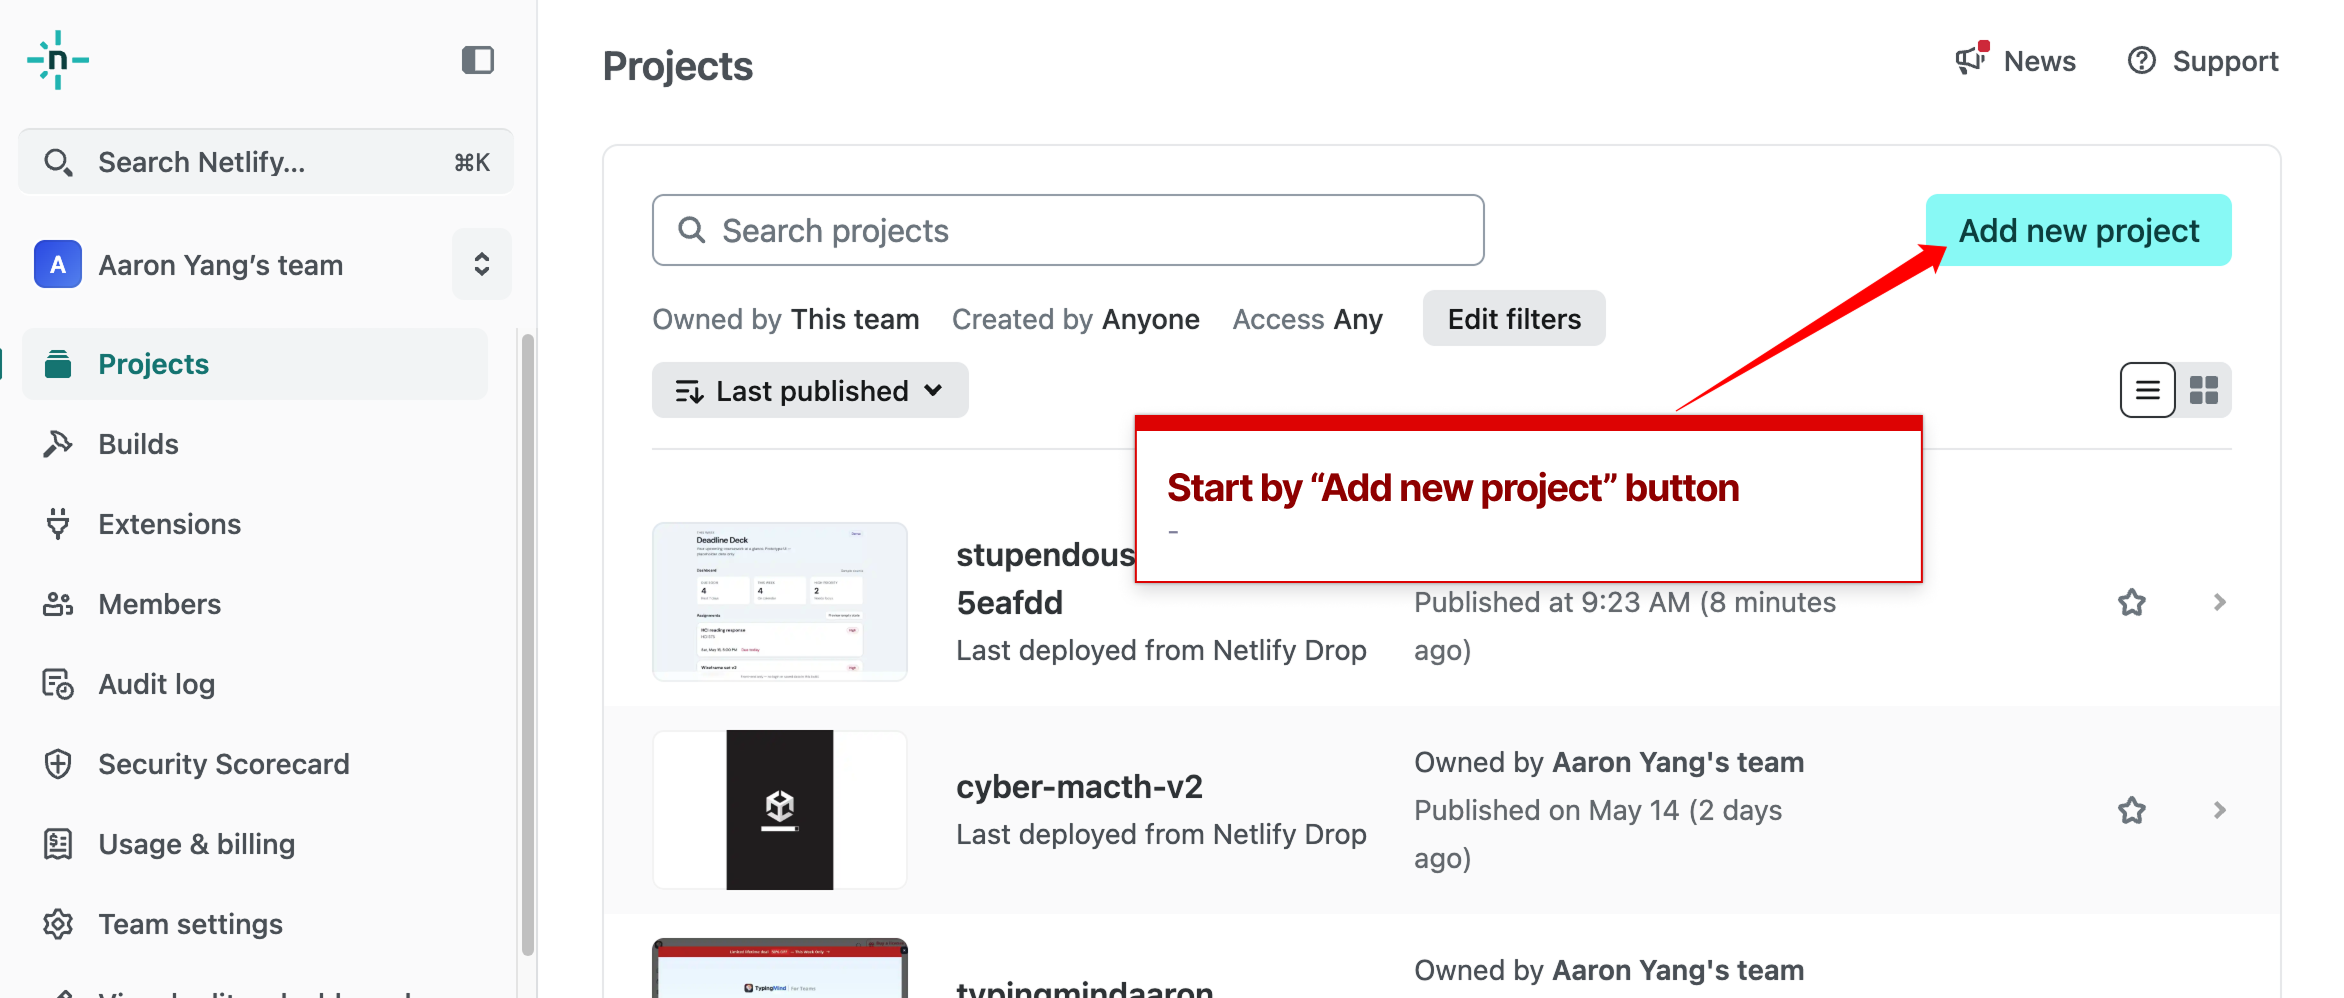
Publish a Static Website to Netlify
Step 1
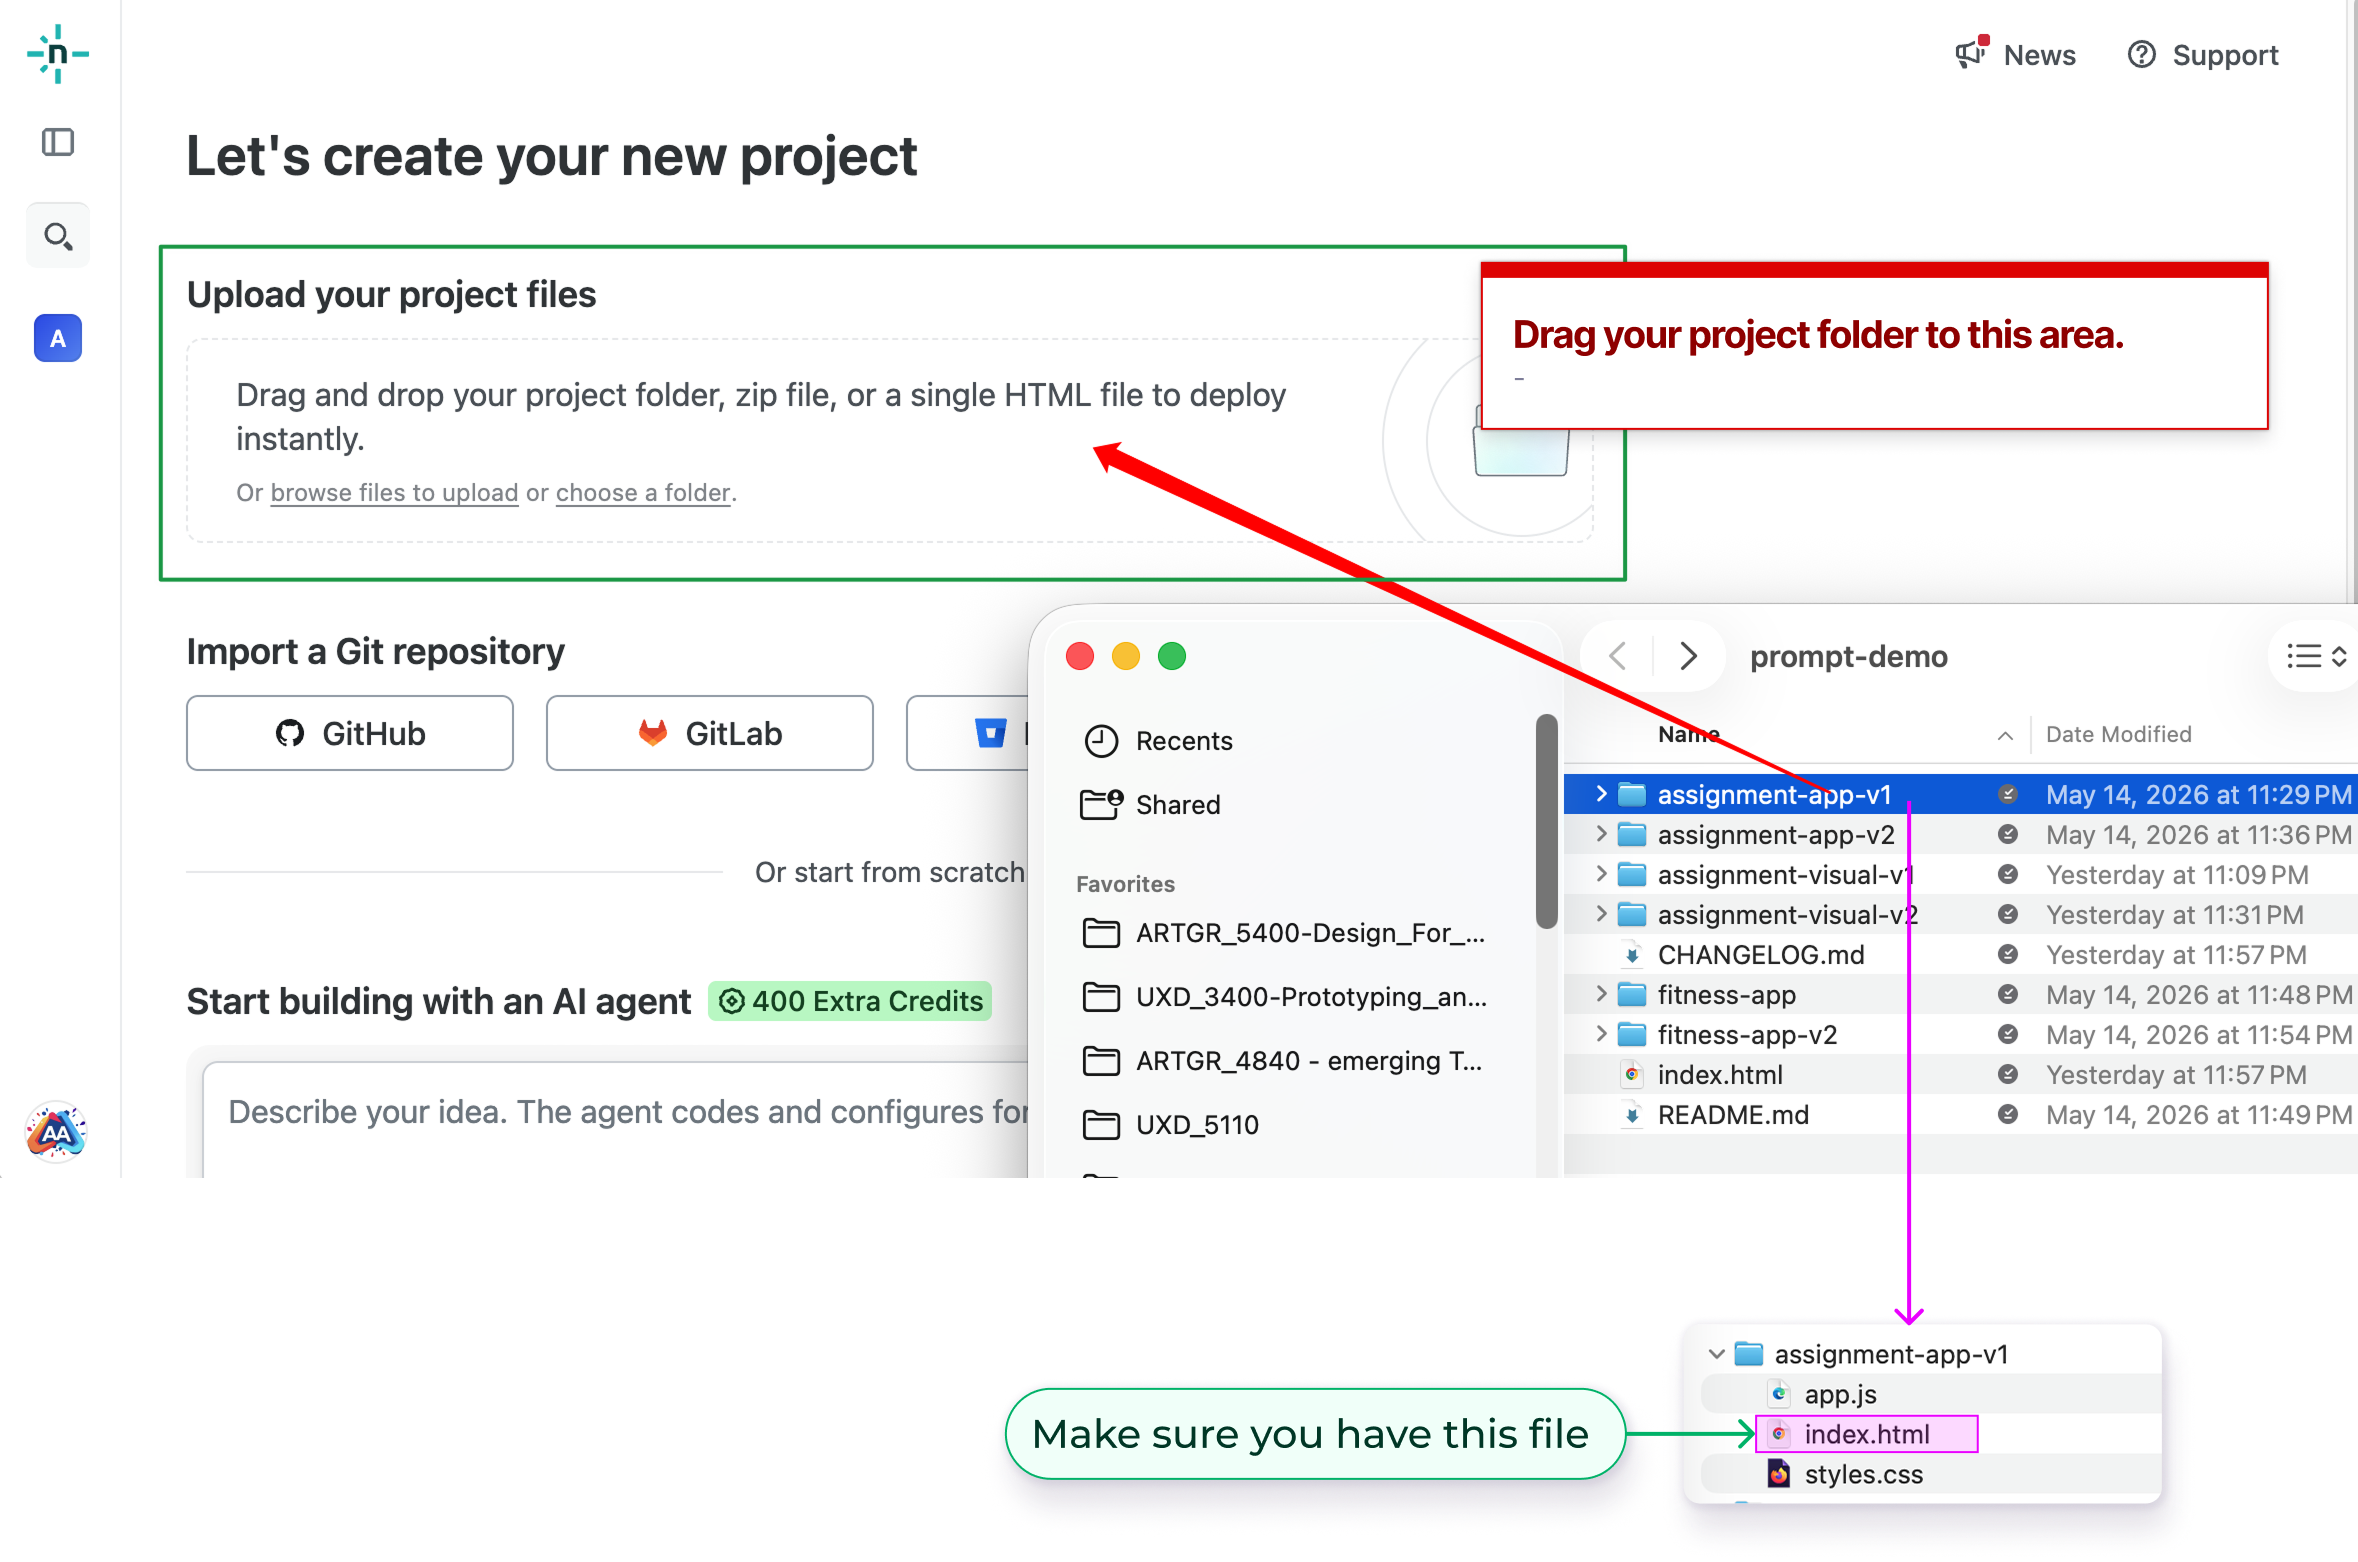
Step 2
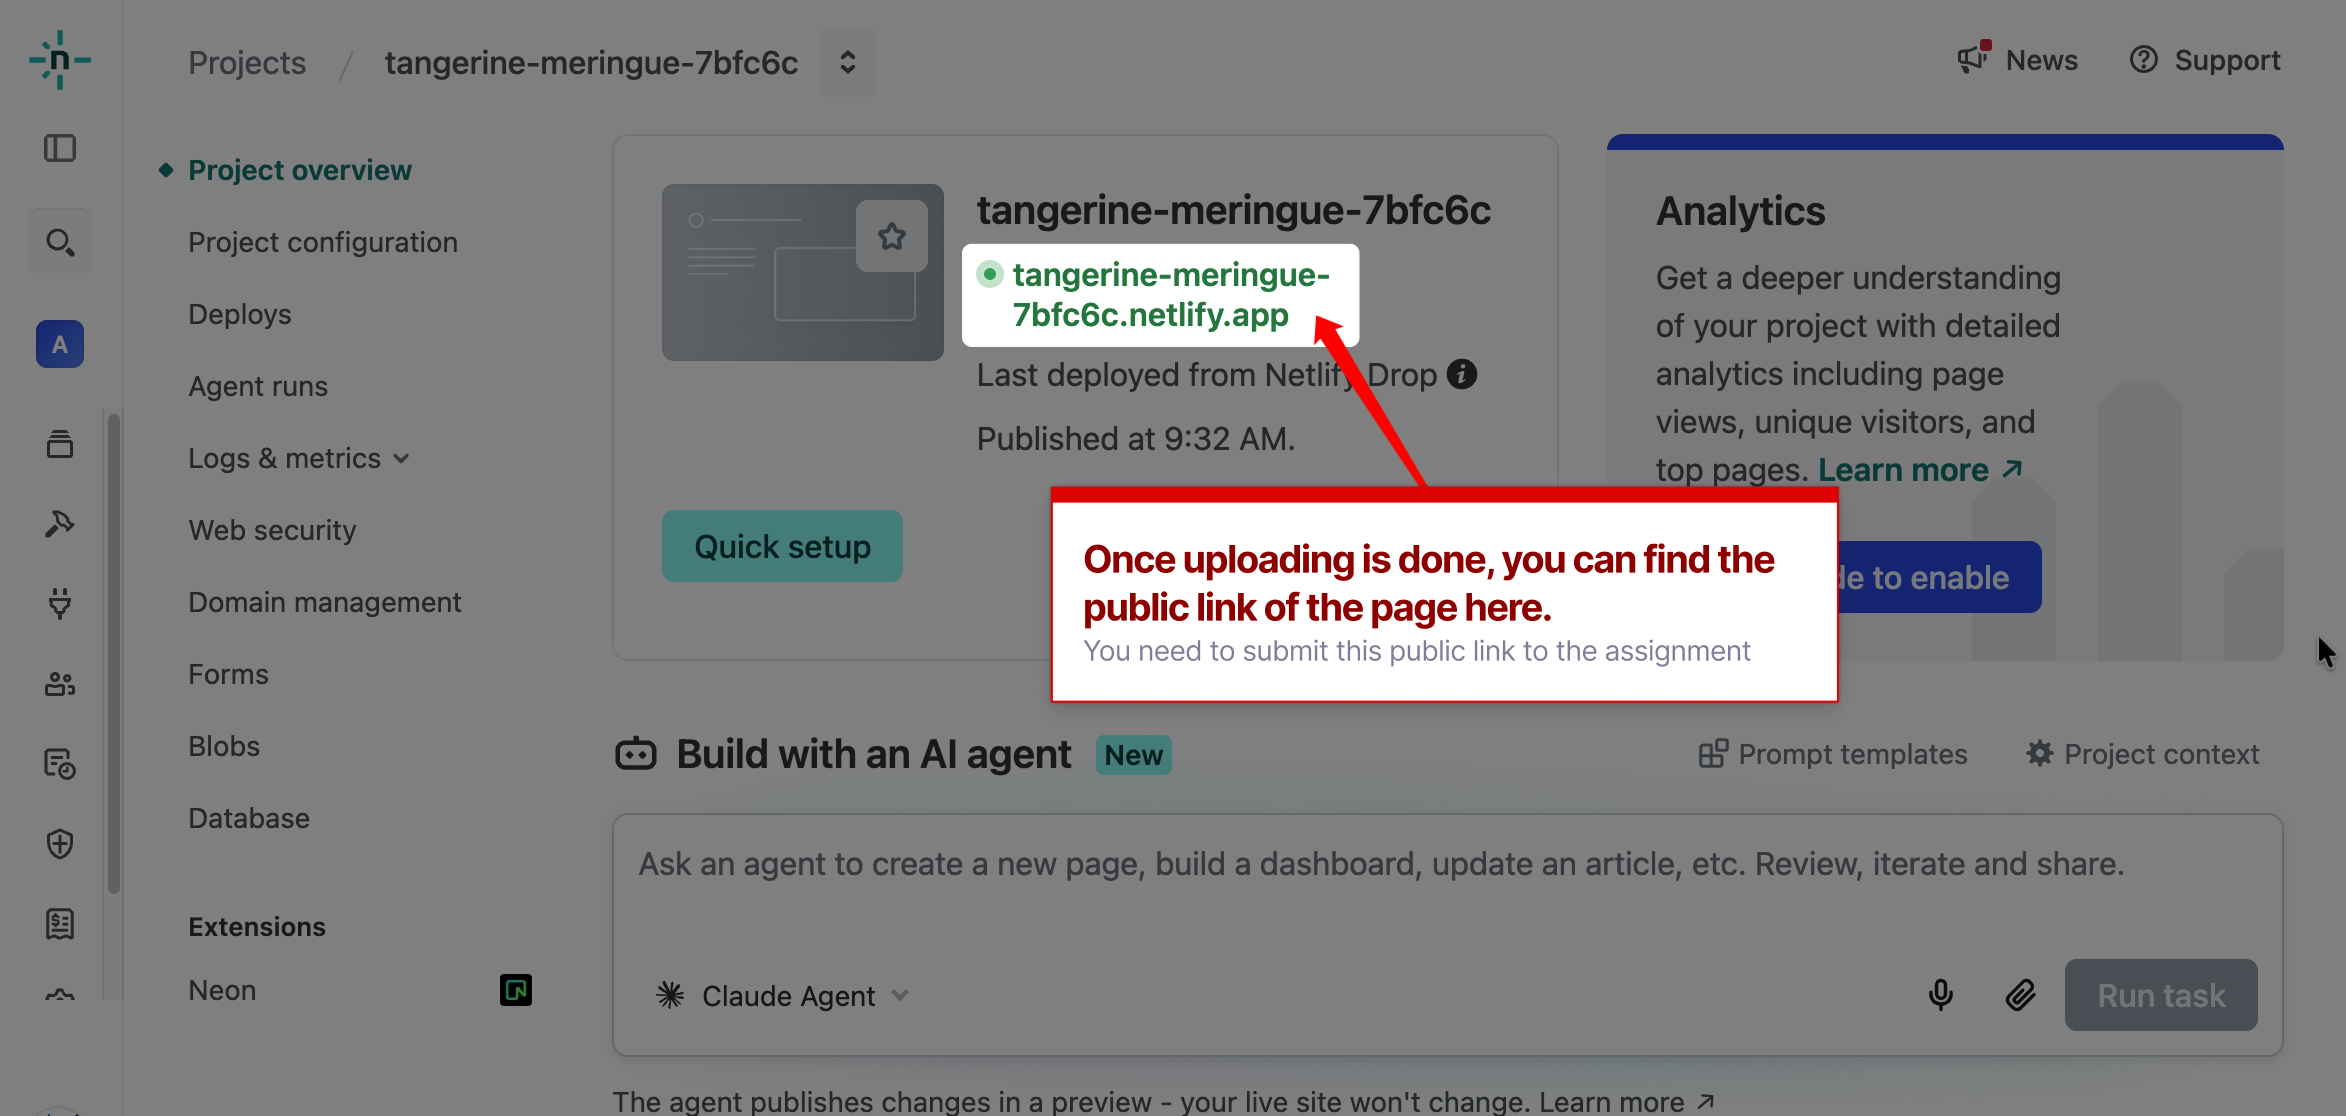
Step 3
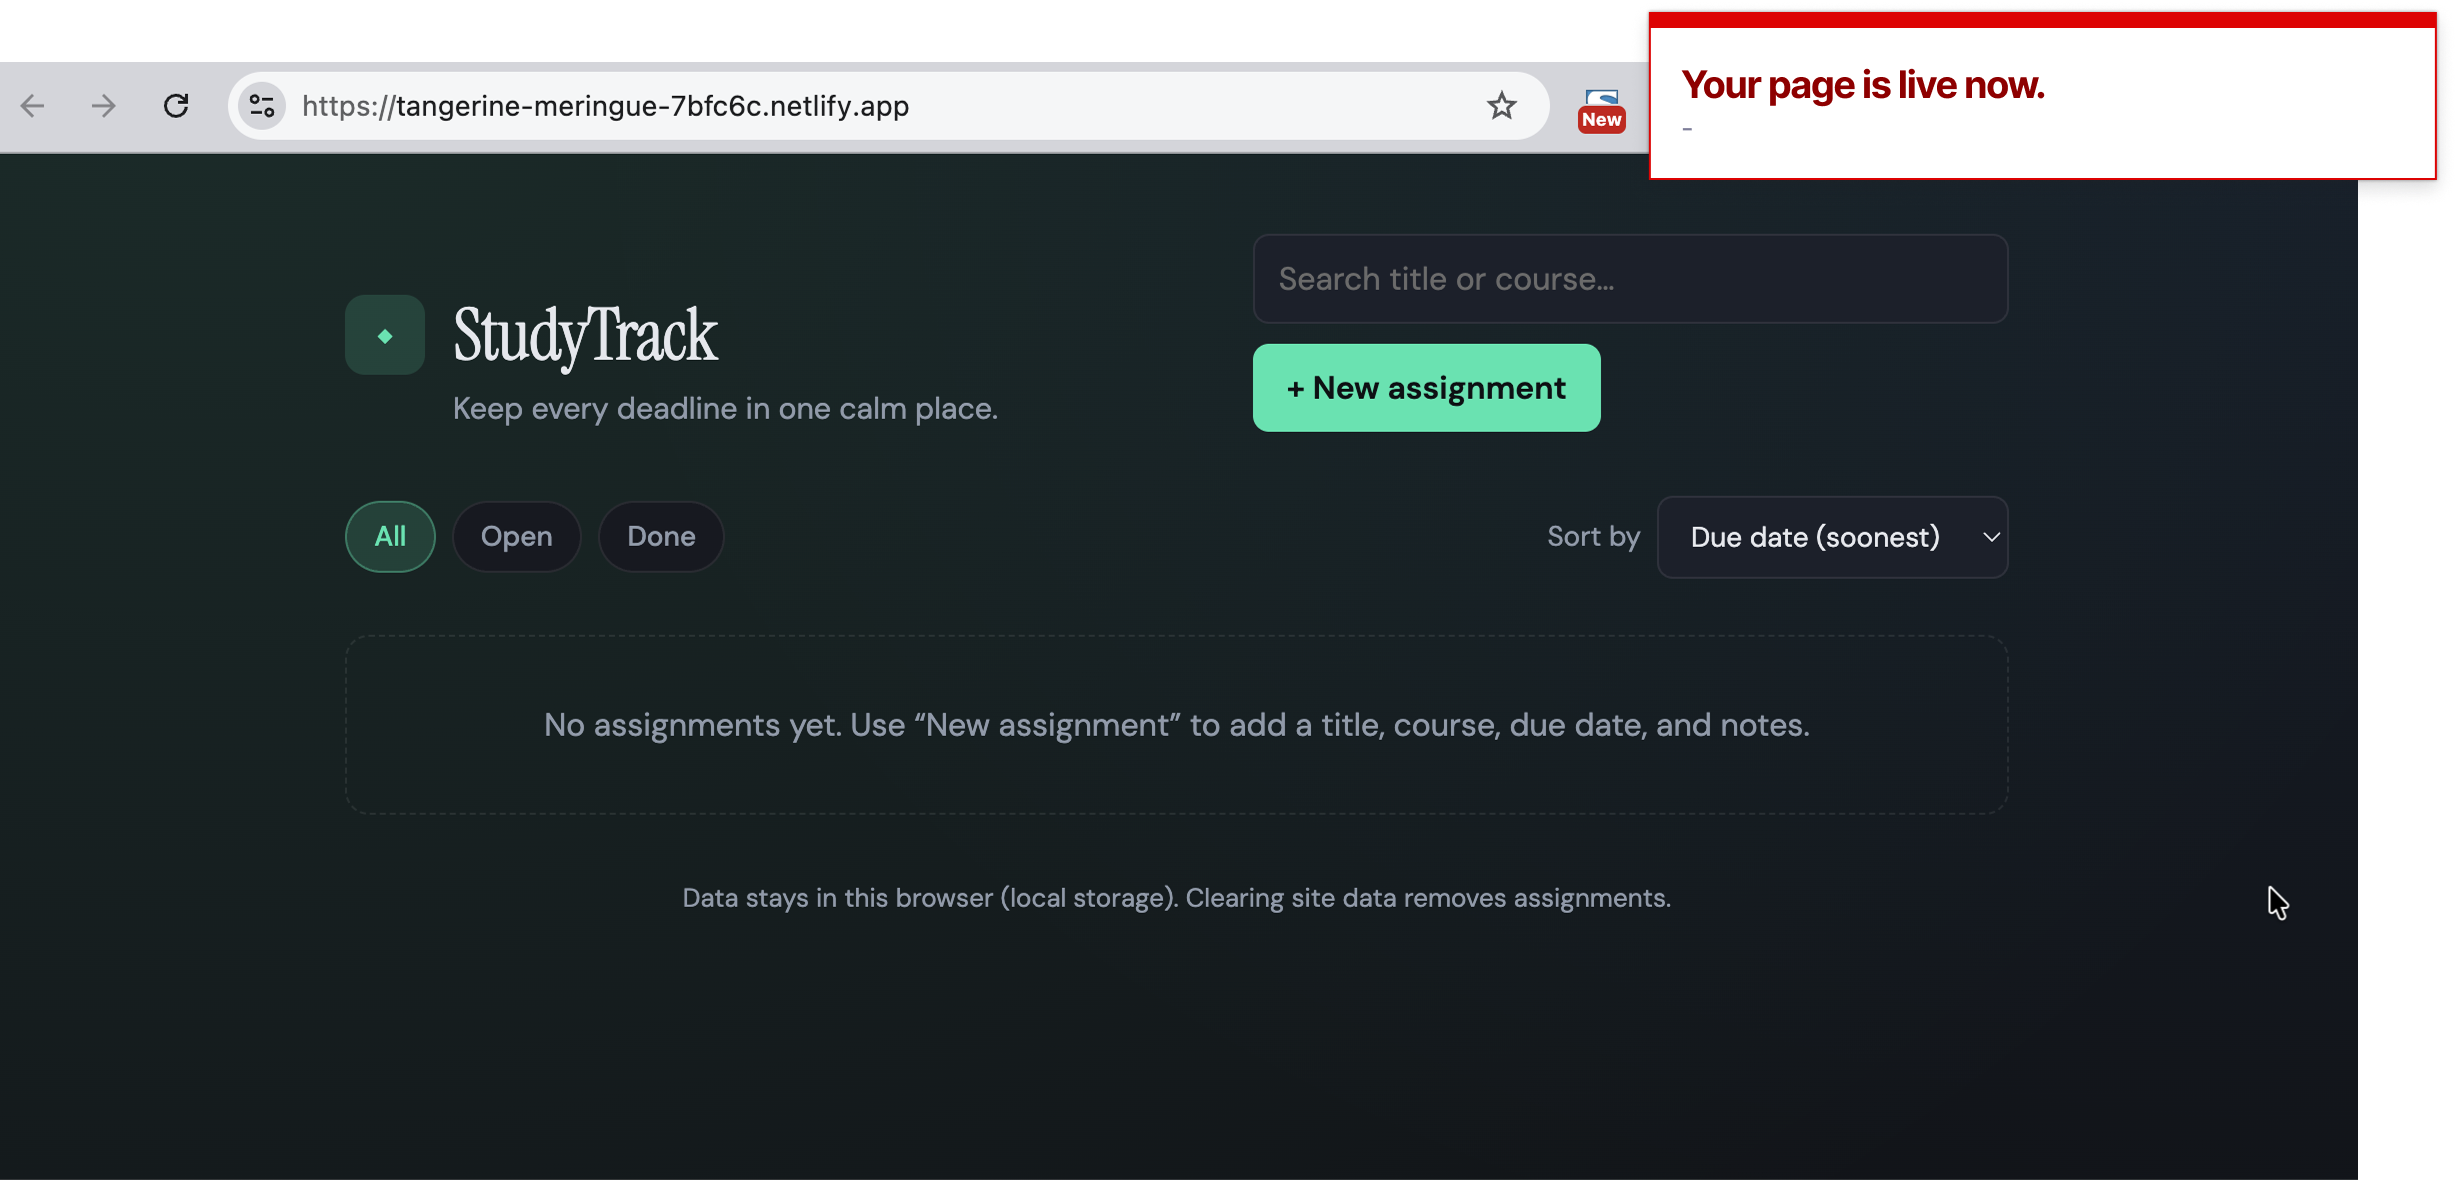
Step 4
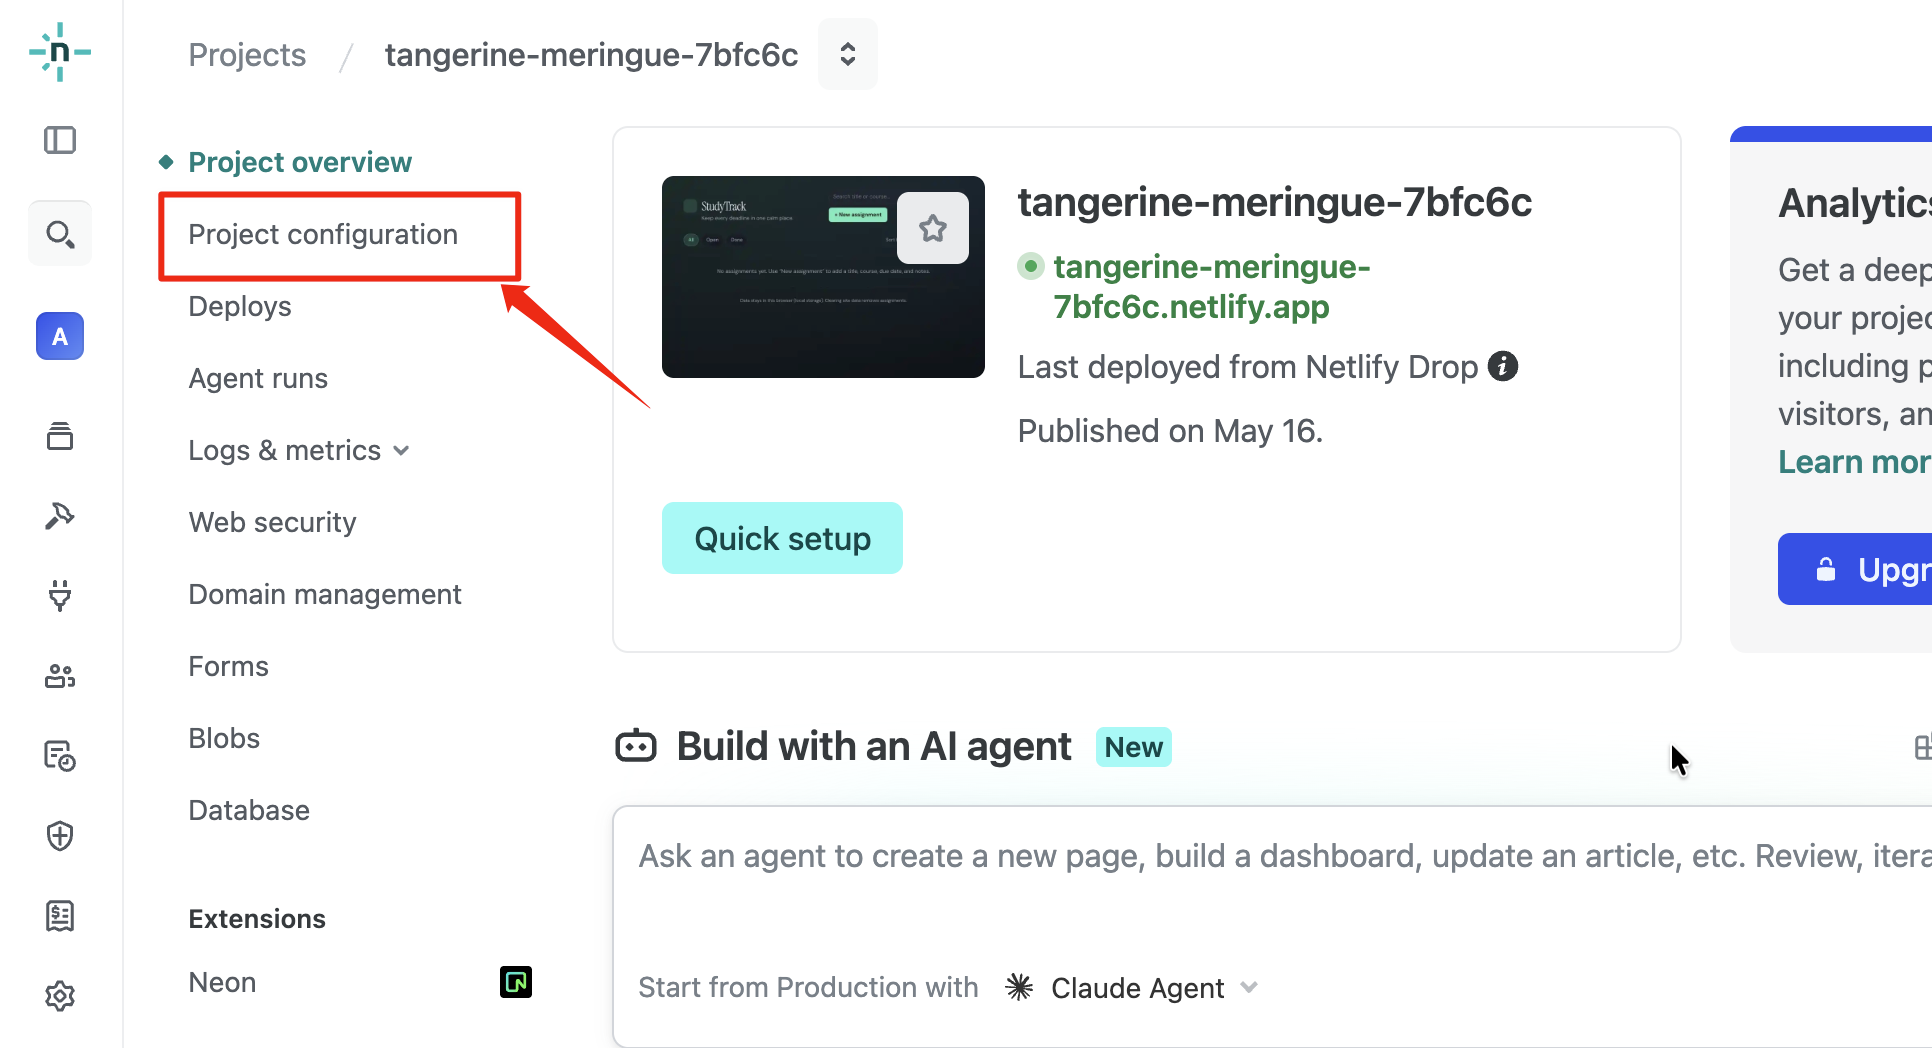
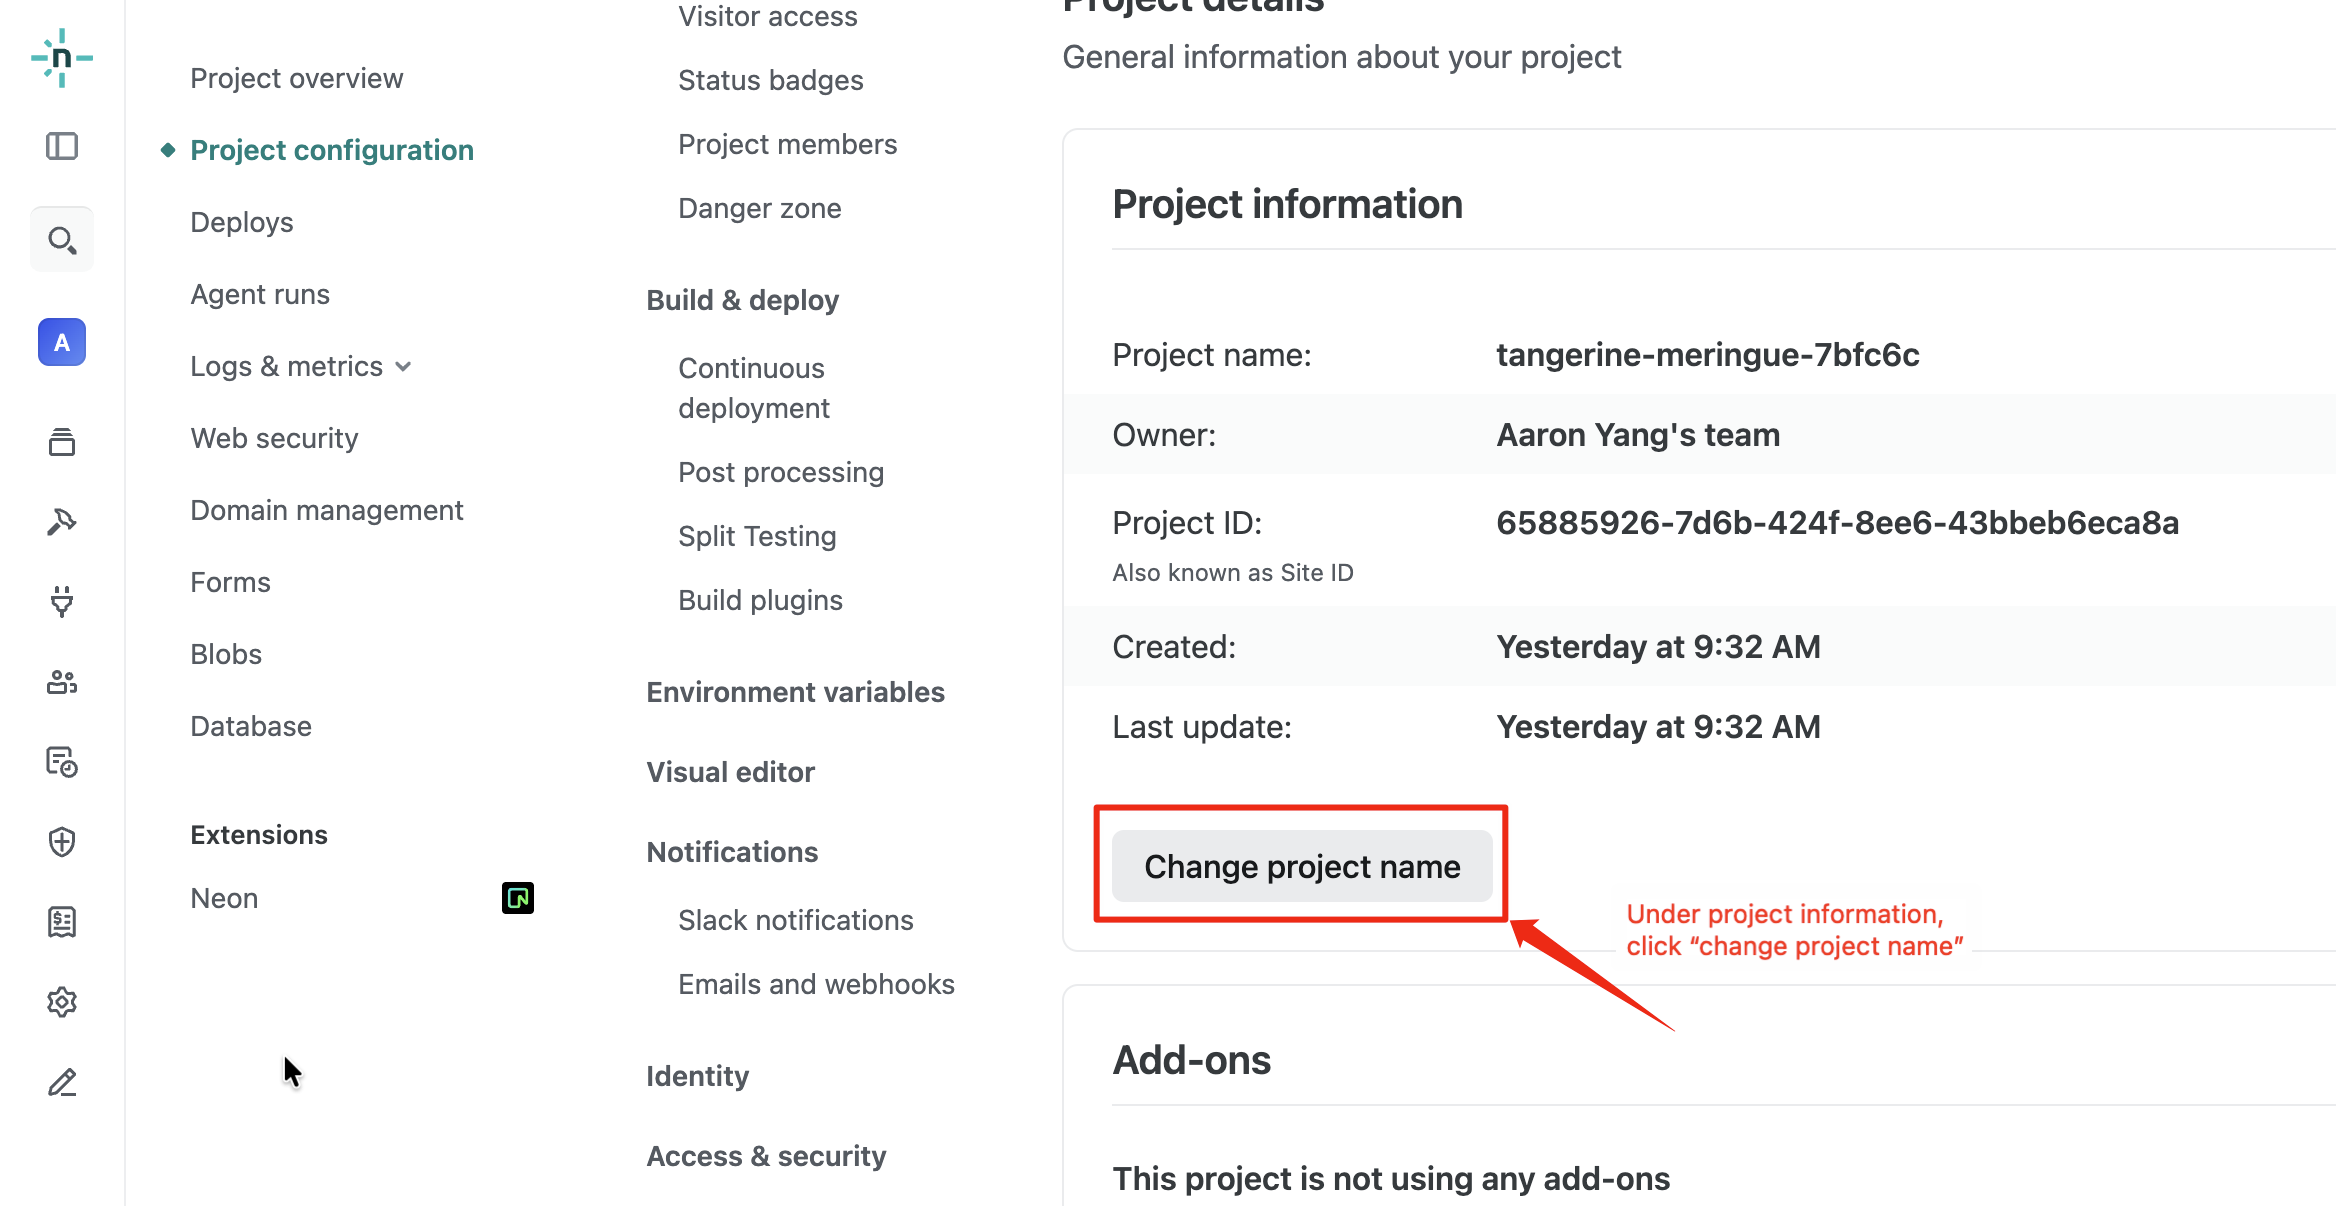
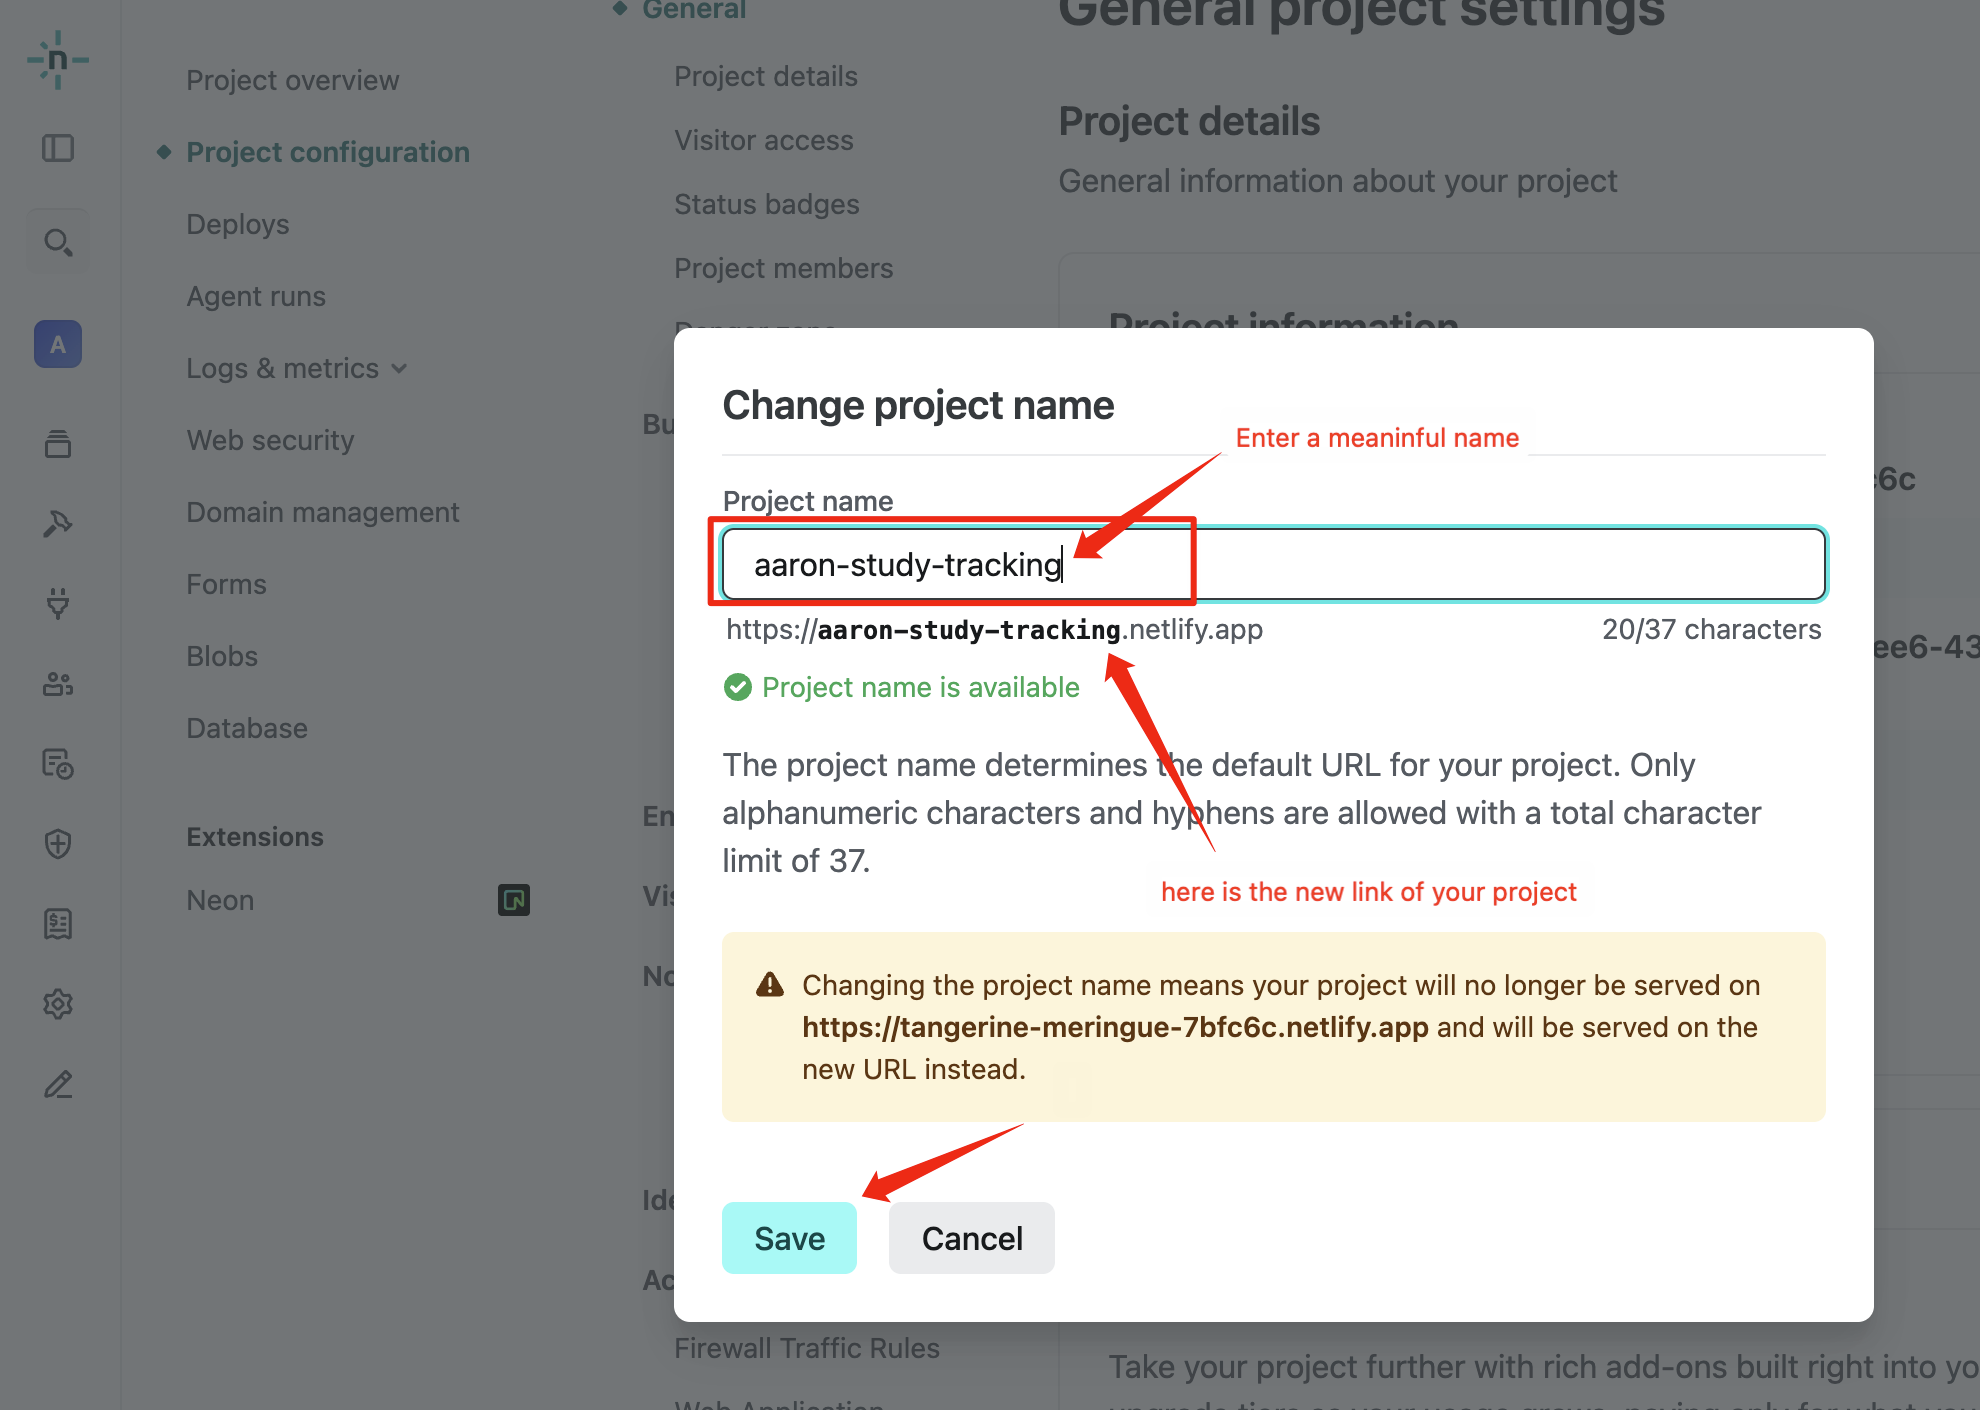
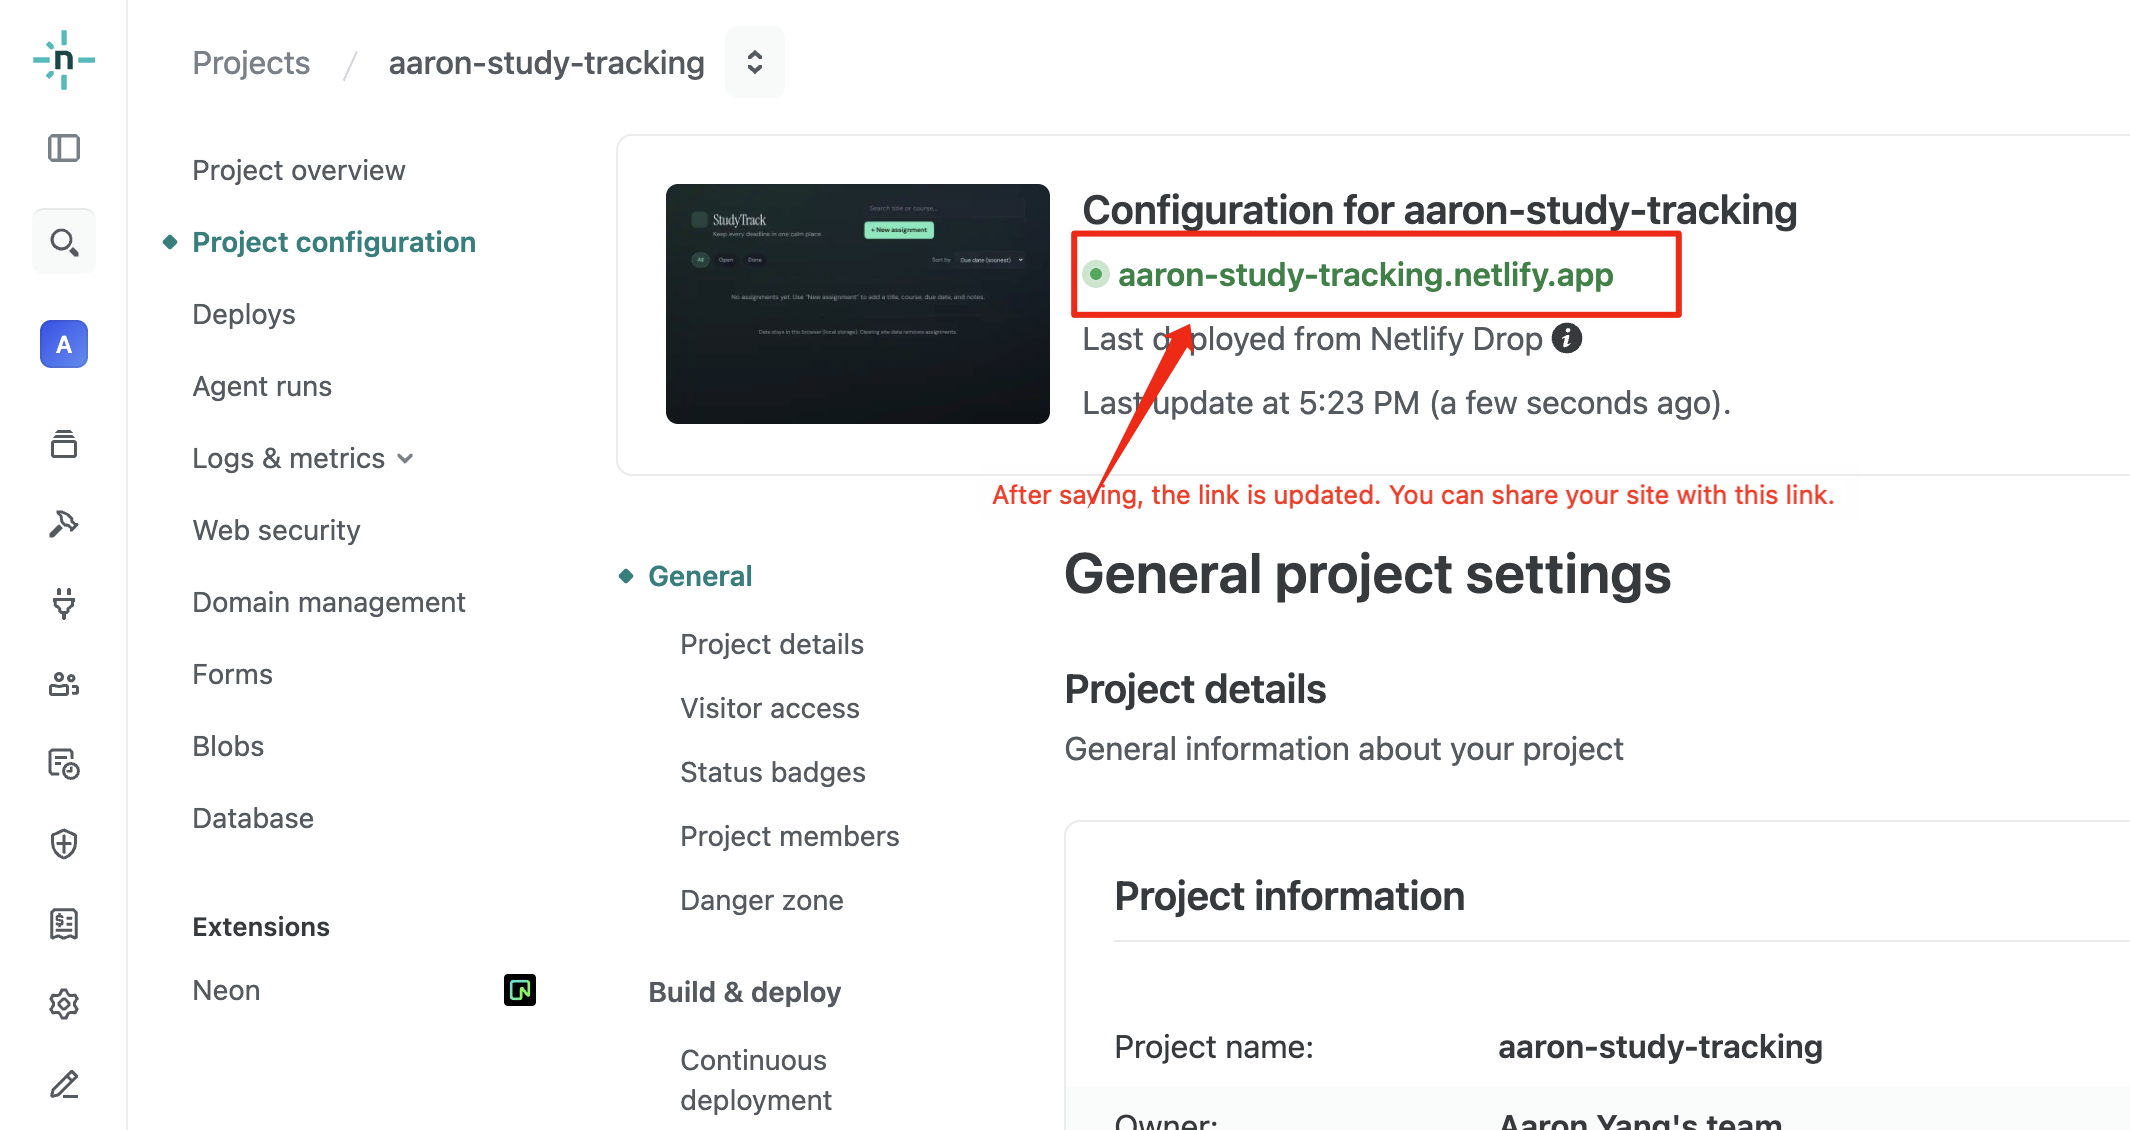
Customize the Link Name
Step 1
Step 2
Step 3
Step 4
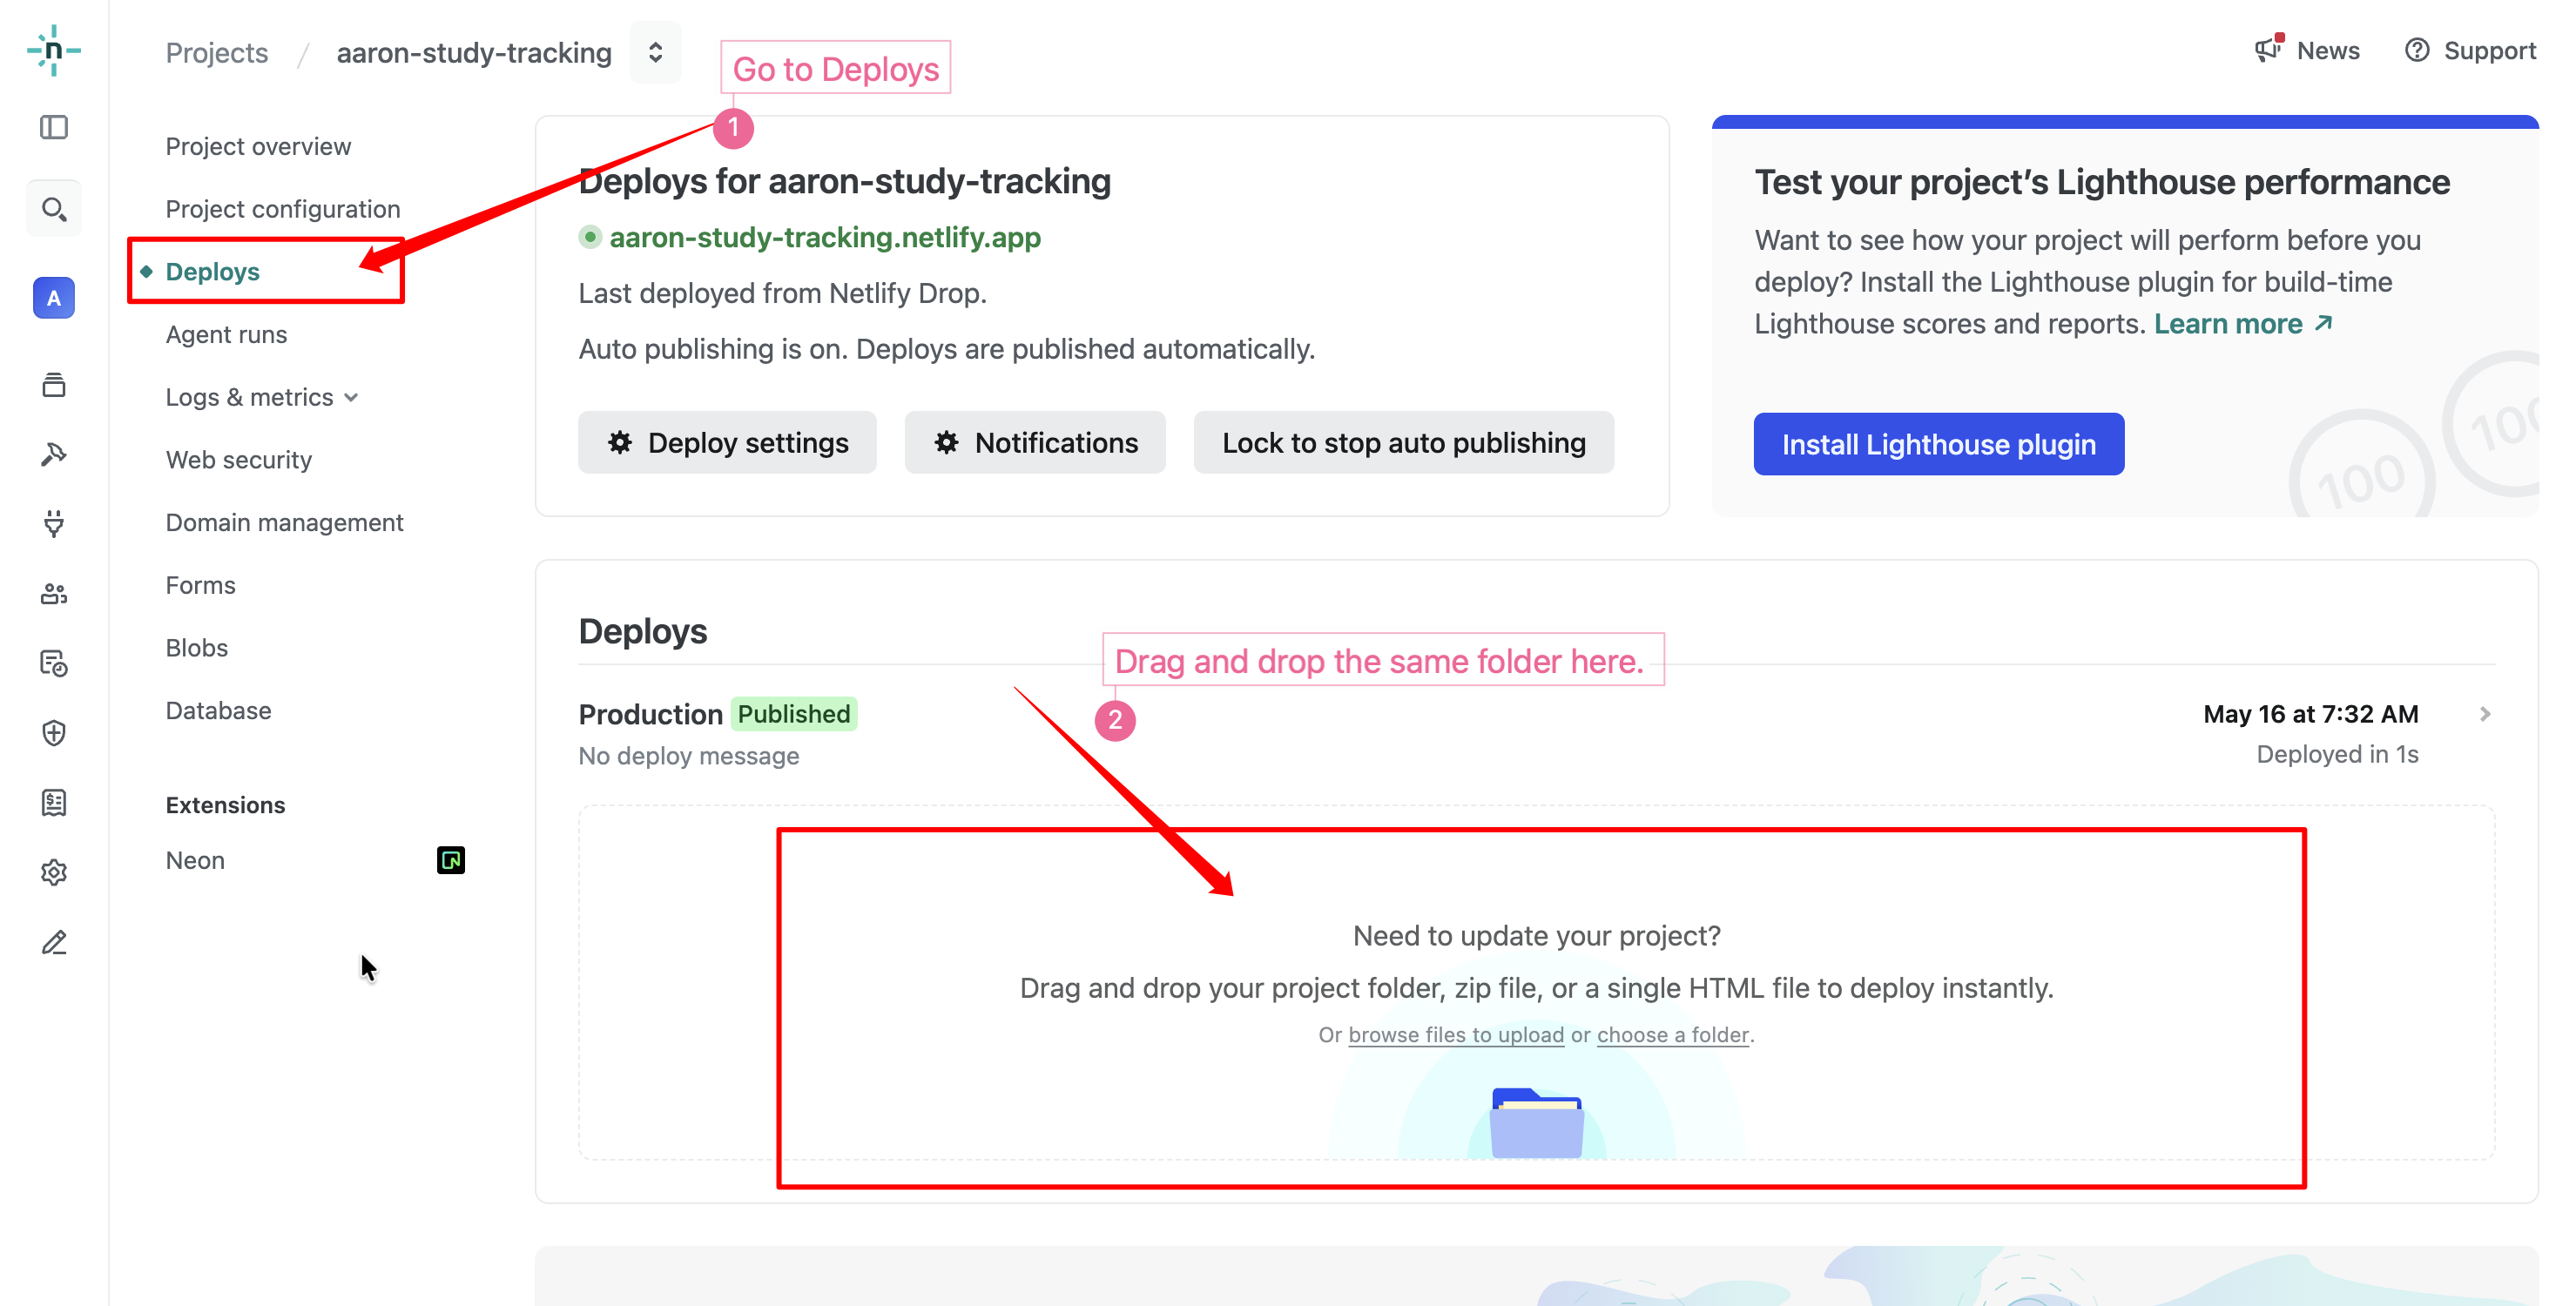
How to update a published project in Netlify
Mini Project 1: Explore Vibe Coding
Technology Setting Ups
Following resources would provide enough AI usage for this course with no cost. If you have subscriptions to other tools, such as Codex and Claude Code, you can also use them.
-
Setup Figma Professional account Free education plan available
Education status verification is needed to get free access. Learn more
-
Setup Cursor Pro account (One year free for student) and install Cursor Free for students
Student status verification is needed to get free access. Learn more
-
Setup Netlify account Free
-
(Optional) Signup GitHub Student Developer Pack and install Visual Studio Code and GitHub Desktop Free for students
The package includes Copilot, Microsoft's AI agent, with generous tokens. Learn more
What to Do
- Complete course content for week 1 at ai.aaronyang.me/week/week-1.html
-
Create a simple web application (either single-page or multi-page) using one of the following tools:
- Cursor (either agent window or IDE window)
- VS Code
- Codex
- Claude Code
You cannot use Figma Make at this time. You have to preserve Figma AI credit for future projects.
- Publish your web application to Netlify.
What to Submit
Important
Submit the following in Canvas: https://canvas.iastate.edu/courses/127779/assignments/2814317
-
Input following in the Text Entry field:
A. Enter major prompts you used to initiate the project, update the page, or debug issues.(30% of total points)
B. For each prompt you provide, specify how well it works. If it is not working well, explain the challenges you had.(20% of total points)
C. Enter the link to your published site on Netlify or any other hosting.(50% of total points)
Design Topics
Here are some design topics you can explore for your mini project:
Caffeine "Jitter" Tracker
Users log the drinks they’ve had today (coffee, tea, soda). The app calculates the total milligrams of caffeine and updates a visual "jitter meter" that shakes based on the intake.
Color Contrast Validator
Users paste two hex codes. The app displays them side-by-side as a button and background, calculating if the combination passes web accessibility standards, giving a "Pass" or "Fail" badge.
Dream Desk Setup Visualizer
Users click through menus to change the components of a digital desk (e.g., swap the monitor size, change the keyboard color, pick a desk plant), building a personalized workspace.
Bento Box Lunch Packer
Users are given a 4-section grid. They click buttons to drop different food items into the sections, aiming to balance a visual "nutrition score" or "budget score."
Plant Watering Dashboard
Users add specific plants (e.g., Fern, Cactus) and the app creates a countdown timer for each based on its watering needs. Clicking "Water" resets the timer and triggers a water droplet animation.
Mood-Based Movie Selector
A 3-question branching quiz (e.g., "How much time do you have?", "Want to laugh or cry?"). Based on the path chosen, the app reveals one specific movie poster and synopsis.
Assignment Management
A dashboard that a student can view and submit assignments in different courses.